Play Surround-Sound from a Regular CD
Audio May 27th, 2007CD-Rs have made audio playback for theatrical productions much easier than it was back in the day. You get instant random-access cuing, instant start, track titles and you can make changes to your sounds faster than real time. One of the downsides of CDs is that they only will play 2 tracks at a time (Left and Right). Many productions could benefit from additional tracks, whether it is for true surround-sound or you want to have a separate speaker for each sound source onstage. There are many computer and tape-based solutions available, but turns out that it’s not only possible but fairly easy to get 5.1 channels from a regular CD player.
What You Need
- Audio Editing Software (Surround capabilities preferred but not required)
- DTS or Dolby Digital Encoder Software
- CD Burner
- CD (or DVD) Player with Digital Output (Optical or SPDIF)
- DTS or Dolby Digital Decoder
Building Your Sounds
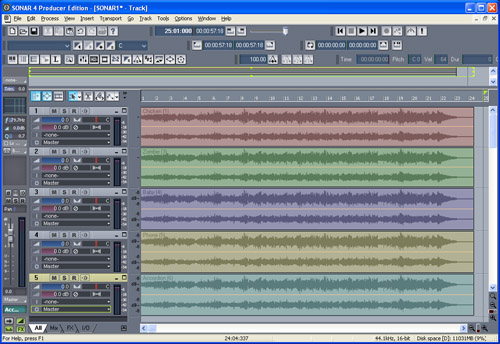
First you need to create your sounds. You need to end up with a separate .wav file that corresponds to each of the 6 channels you will be playing back. Some audio editing software comes with a surround panner that lets you get fancy with this (Sonar, Nuendo, etc.), but to make things simple let’s assume that we want 5 totally separate sounds coming out of 5 separate speakers. On our stage we have a chicken, a zombie, a crying baby, a phone that won’t stop ringing and a guy playing an accordion. Match these sounds up with available DTS / Dolby Digital surround channels:
- Left Front- Chicken
- Center – Zombie
- Right Front – Baby
- Left Surround – Phone
- Right Surround – Accordion
- LFE (Sub) – Unused
We’re not doing an actual surround setup, so it doesn’t matter which channel you map to which sound. Just make sure that later when you are setting up your speakers you get them in the right places.
Get your sound effects. Find them on CDs, on the Interweb, record them yourself or wherever you need to get them.
Load your sounds into your audio editing software. Trim them all so that they’re the same length. Let’s say we want our audience to hear this symphony for 1 minute, so edit all the sounds so they are a minute long. If they aren’t exactly the same the decoder software will probably be able to figure it out anyway, but you at least want to make sure that you don’t cut off your zombie right in the middle of the word “braaaaaaaaaaains”.

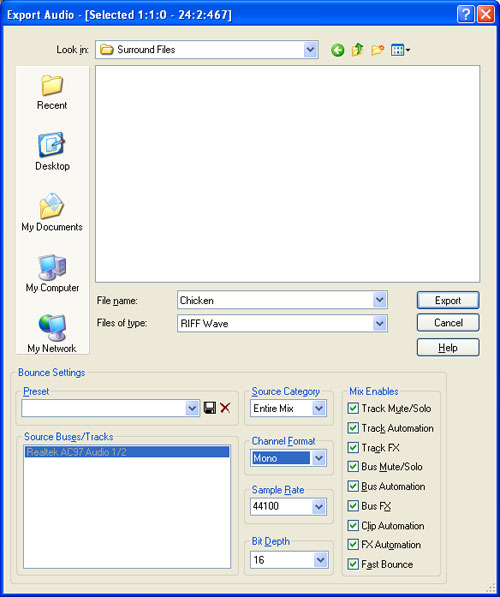
Save all your edited sounds as 44.1khz 16-bit mono .wav files.

Encode Your Sounds
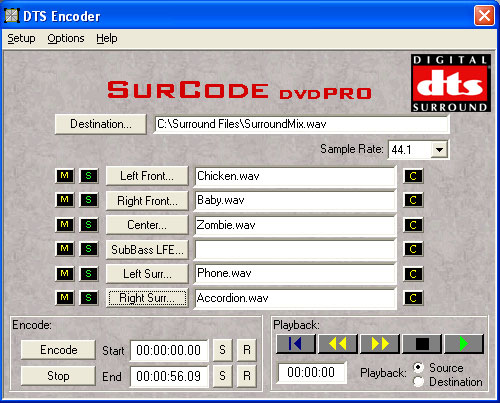
Fire up your encoding software. There are several to choose from, and some audio editing software even comes with an encoder. I’m going to show you how to use SurCode DTS-DVD because that’s what I have. You may need to adapt the settings listed here to your software.

Click the “Destination” button.
Browse to the folder where you want to save your file, type in a name, make sure the file type is set to “*.wav” and click “Save”.
Back on the main window select 44.1 as the Sample Rate.
Start loading your sound effects into their corresponding channels. Click “Left Front” and browse for the mono .wav file you made earlier that is supposed to come out the Left Front speaker. Continue doing this until you have all the channels populated.
Click the “Encode” button to begin the encoding process. When it’s done you will have a .wav file with 6 tracks of audio all squished into one.
Burn Your CD
Burn an audio CD with your favorite CD burning software just like you would with any other .wav file. You can even burn several .wav’s onto the disc. Neither the burner or your CD player will know that there’s anything special about this audio file, so just work with it like normal. Note: Don’t try to apply any filters to your CD (Normalize, De-Click, etc) or you will screw it up; the file must be burned exactly as it is.
Set Up Your Decoder
You’ve probably noticed by now that when you try to play your new CD it just sounds like this:
SHHHHHHHHHHHHHHHHCRACKLEHHHHHHHSHSHSHSHSHHHSSHHSHSSHISSSSSSSS!!!!!1!
That’s because you didn’t burn audio onto the CD; you burned a digital data stream. You have to decode it now.
Connect the digital output of your CD player to the input of your surround decoder (analog won’t work for this).
Connect the 6 line-outputs from your decoder (or 5 for this example if you’re lazy) to amplifiers.
Connect the amplifier outputs to speakers. Place the speakers where they need to be to produce the desired effect.
Note: These instructions assume you have all separate components. Your devices may combine 2 or more components (home theatre receiver with surround decoding and built-in amplifiers, DVD player with built-in surround decoding and discrete channel outputs, computer surround-sound speakers with built-in decoder, etc.)
Testing
Turn everything on, make sure you select the righ input on your decoder, and hit play on your CD player. You should be greeted with 5 separate sounds coming from 5 separate places.
If you still hear the data stream it means that either you still have your analog outputs hooked to something or your decoder didn’t detect the stream and switch to surround mode.
Hopefully everything worked and you are now ready to take your sound designs to the next level.
Resources
Audio Editing Software
- Sonar (Has surround panner; no encoder included)
- Nuendo (Surround encoders optionally available
- Sound Forge (Dolby Digital encoder included)
- Adobe Audition)
- Easy Media Creator
Surround Decoders
- Technics SH-AC500D
- Millennium 2.4.6

