Overclock Your Game Boy Advance
Game Boy April 2nd, 2007
Overclocking your GBA (and underclocking it) will allow you to skip boring parts of games, make them more challenging, slow down parts that are too difficult, or squeeze out some extra clock cycles for your homebrew apps. You also get to show off your modded GBA in front of your “L33T” friends. It’s not as hard as you might think, and you can switch between speeds on the fly.
What you need:
- Original Game Boy Advance
- GBAccelerator overclocking chip
- Tri-Wing Screwdriver
- Small Phillips screwdriver
- 30 AWG kynar wire-wrap wire
- Low-wattage, fine-tipped soldering iron
- Fine, rosin-core solder
- Wire cutters
- Wire stripper
- Needle-nose pliers
- Double-sided tape
- Cup or bowl to contain parts
Disassemble the GBA
Remove the battery cover and set it aside.
Remove the seven screws from the back of the GBA (6 tri-wing and one phillips). Place the screws in your parts container. You will lose them if you don’t! No matter how careful you try to be if you just set them on your workbench or table, something is going to knock them off and you will never find them again. It’s one of those mysterious laws of the universe.

Lift the back cover off of the GBA and set it aside.

Remove the L & R buttons, 2 shoulder pieces and power switch and place them in your parts container.

Remove the two screws that hold the PCB in place (phillips). You know where to put them.
Flip the board over. Be careful as it is still attached to the screen by a ribbon cable. Try not to accidentally pull the screen out of the front of the case as it could encourage dust to get in there.
Remove Existing Crystal
Desolder and remove the Crystal (Labelled X1). This is harder than it sounds. If you are good at surface-mount soldering you should be in business. If not, you may need to resort to slightly more violent tactics. Nintendo used metal crystals in some of their GBAs and ceramic ones in others. The metal ones sometimes pry off pretty easily with a pair of needle-nosed pliers (be very careful not to crack the PCB if you are trying this!!!). The ceramic ones tend to crumble to bits if you try this, which isn’t necessarily a bad thing. You won’t need the crystal any more, so removing it chunk by chunk is a pretty easy way to go. Again, be very careful you don’t damage anything else, especially the tiny SMT parts right next to the crystal.

Install the GBAccelerator
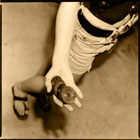
Cut a piece of double-sided tape a bit smaller than the GBAccelerator chip. Use it to attach the chip to the GBA board between the chip that says ARM and the connector the cartridges slide into. This will help the chip stay put while you are trying to solder wires to it.
Start hooking up wires as indicated in this diagram:

In case it’s hard to see, this table shows what connections need to be made:
|
GBAccelerator Connections
|
|
| GND | Cartridge Connector Pin 32 (GND) |
| V+ | Cartridge Connector Pin 1 (S1) |
| CLK | CK1 |
| LED | DL2A |
| BUTTON | TP2 |
| BUTTON | TP8 |
| BUTTON | TP9 |
Try to route the wires as closely as possible to the way they are shown in the diagram. This will keep them out of the way of button pads, standoffs, etc and ensure that you can actually get your GBA back together again. Don’t hold your iron in any one spot for too long or you could burn a solder pad right off of the board. Don’t leave any extra wire inside the GBA as it may make it hard to put back together. The installation should resemble this when you are done:

Reassemble the GBA
Reassemble the GBA. This should be pretty easy if you follow the above instructions in reverse order. You should find all the tiny screws you removed in your parts container. Install batteries. Install your favorite game. Turn the Game Boy on. It should start up as if you never did anything to it.
Test It Out
Now for the fun part. Press the L, R and Select buttons at the same time, then release them. The game video and sound should speed up and the power LED should start blinking. You now have an overclocked Game Boy Advance! Press the buttons again to make it go even faster (the LED will double-blink). Is that 12 Dancing Princesses game just too tough at faster speeds? Press the buttons again and play in slow-motion (LED will fade on and off). One more press of the buttons will bring you back to normal speed (steady LED).
September 29th, 2011 at 9:39 PM
Mmmmm I’ts good but any wire are available ?
October 16th, 2011 at 6:45 AM
I think this is among the most significant information for me. And im glad reading your article. But want to remark on some general things, The website style is wonderful, the articles is really excellent : D. Good job, cheers
October 16th, 2011 at 6:53 PM
Thanks for the beneficial post. Expect to see much more in the near future.
July 6th, 2013 at 4:51 PM
Fantastic site. Plenty of helpful info here. I am sending it to some buddies ans additionally sharing in delicious. And of course, thanks for your sweat!
August 29th, 2013 at 8:48 AM
Wonderful goods from you, man. I’ve understand your
stuff previous to and you are just extremely great.
I actually like what you have acquired here, really like
what you’re saying and the way in which you say it.
You make it enjoyable and you still take care of to keep it
smart. I can’t wait to read far more from you.
This is really a great site.
July 22nd, 2018 at 5:09 PM
DE LA MERDE VIVE LE BACKLIGHT AGS 101 !!!
March 10th, 2019 at 11:47 AM
Heh, this was before AGS 101 backlights were a thing =)
June 5th, 2019 at 6:00 PM
Hello,I read your blogs named “Modd3d » Overclock Your Game Boy Advance” like every week.Your story-telling style is witty, keep doing what you’re doing! And you can look our website about proxy list.
April 21st, 2022 at 5:50 PM
Where can I buy it?